Pipes and tubes are usually measured by the outside diameter dimension – or OD. One might think that a 2.0 inch OD tube would measure 2.0 inches and a 6.5 inch OD tube would measure 6.5 inches. However, machines today cannot hold dimensions precisely to the nominal value, and because of that there must be acceptable degrees of variations. In other words, every dimension on a blueprint is subject to variations from the nominal value and so is “roundness”. But “out of roundess” measurement can be contained.
Tubes, pipes or solids will have a range of values that would be acceptable and considered as ‘x’ nominal OD. Roundness tolerance (+/- 0.01 inch) would mean the difference between major OD and the minor OD throughout the profile should not be greater or less than 0.01 inches.
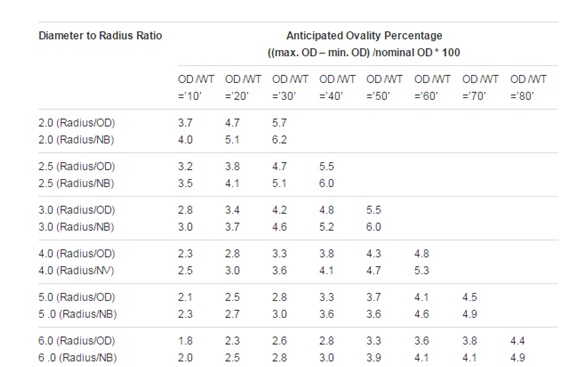
When bending round profiles to a certain radius, the greater the OD to bend radius, the higher ovality should be expected.
American Society of Mechanical Engineers ASME states the following, “on section B31.1-2001 104.2 Curved Segments of Pipe (B) For ferrous material, when the radius of a bend is 5 nominal pipe diameters or greater, and the nominal wall thickness of the pipe is schedule 40 or thicker, the difference between maximum and minimum diameters shall not exceed 8% of average measured outside diameter of the pipe before bending.”
As a guideline, we consider 5% ovality as an acceptable measurement. That said, the ovality should always be discussed and determined by the end user prior to rolling. The table below can be used as reference for expected ovality when bending hollow pipe or tube.

Chicago Metal Rolled Products works closely with the end-user when ovality and roundess of the finshed curved pipe are tube are of concern. Contact us for your next


